Upload your photo
JPG, PNG or WebP
2. Stencil style
3. Adjust
Upload an image to preview stencil
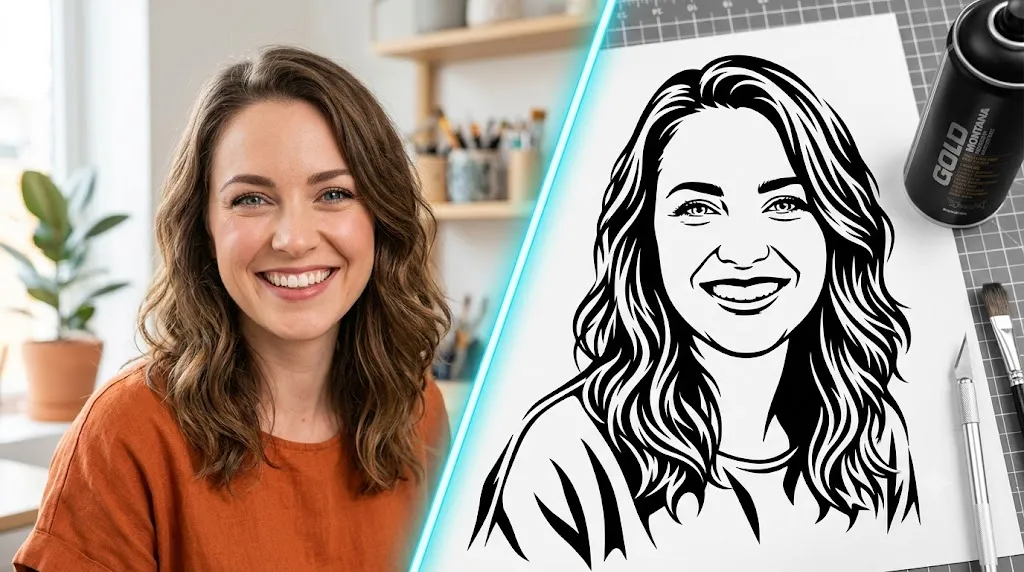
Creating a clean stencil from a photograph does not have to require complicated design software. With a Free Stencil Maker Pro Online, you can upload an image, simplify its details, adjust conversion settings, preview the result, and prepare artwork for printing, painting, or cutting.
The most important factor is not simply the tool you use. Your source image, contrast, background, level of detail, and final material all affect the quality of the finished stencil. A clear subject with strong separation from its background usually produces a much easier design to refine.
For more advanced projects, you can work with multiple layers, adjust colors and filters, add structural bridges, and export individual stencil files. Depending on the tool and your workflow, formats such as PNG and SVG can also be useful for digital editing and cutting applications.
This guide explains how to turn an image into a practical stencil, which settings matter, how to prepare designs for Cricut and cutting machines, and how to avoid common problems before printing or cutting.
How a Free Stencil Maker Pro Online Works
A photo-to-stencil workflow begins with an input image. The software analyzes areas such as contrast, boundaries, and tonal differences and converts them into simplified shapes.
Instead of trying to preserve every detail in the original photograph, the goal is to identify the visual information that needs to remain after the design is printed, painted, or cut.
A typical workflow looks like this:
- Choose a suitable photograph.
- Upload the image.
- Crop or clean the background if necessary.
- Select a conversion method.
- Adjust contrast, color, or filter settings.
- Generate the stencil preview.
- Correct weak or unwanted areas.
- Check bridges and enclosed sections.
- Export the finished design.
- Print, paint, or send the file to your cutting workflow.
The preview stage is particularly important because a design that looks good on screen may not remain physically stable after cutting.
How to Turn a Photo Into a Stencil
1. Choose the Right Image
Start with a photograph containing a clearly recognizable main subject. Images with strong contrast between the subject and background are generally easier to convert.
Look for:
- A focused main subject
- Strong tonal separation
- Minimal background clutter
- Clearly visible edges
- Sufficient image resolution
- Limited overlapping objects
A complicated background can introduce unnecessary shapes into the conversion. If several objects overlap, the software may interpret them as connected regions, increasing the amount of manual cleanup required.
For most projects, a simple photograph with a recognizable silhouette is a better starting point than an extremely detailed image.
2. Upload and Crop the Image
After selecting your source image, upload it into the online editor.
If the photograph contains unnecessary areas around the subject, crop them before conversion. Removing irrelevant parts gives the conversion process less information to interpret and can make the resulting stencil easier to edit.
You should also consider the final physical size. A design intended for a small craft project may need different levels of detail from one intended for a wall-sized stencil.
3. Adjust Conversion Settings
Different images require different settings. There is no single threshold, contrast level, or filter strength that works perfectly for every photograph.
Depending on the editor, useful controls may include:
- Threshold
- Contrast
- Hue
- Saturation
- Value
- Filter strength
- Sharpness
- Smoothness
- Color mapping
- Layer count
The objective is not to preserve maximum detail. The objective is to create a design with clear shapes that remain practical after cutting or painting.
If narrow areas become too fragile, simplify them or strengthen the relevant sections. If the design contains excessive visual noise, use smoothing or simplification controls where available.
Stencil Preview: The Most Important Quality Check
Always inspect the generated preview before downloading or printing the final design.
Look for:
- Tiny disconnected fragments
- Extremely narrow sections
- Unwanted background areas
- Missing facial or structural details
- Enclosed islands
- Weak bridges
- Incorrect layer separation
- Areas that may become difficult to cut
A good preview can save significant time because problems are much easier to correct digitally than after the stencil has already been printed or cut.
Manual Editing and Corrections
Automatic conversion is useful for creating the initial design, but manual editing can improve difficult images.
Common editing functions include:
- Paint
- Erase
- Undo
- Redo
- Clear
- Crop
- Background removal
- Brush-size adjustment
- Correction strength
Use a smaller brush around detailed areas and a larger brush when cleaning broad regions.
When correcting a stencil, focus on physical usability rather than making every tiny part of the original photograph visible.
A slightly simplified stencil can often produce a much better physical result than an overly complicated one.
Creating Multi-Layer Stencils
Multi-layer designs are useful when you want different colors or sections of artwork to be applied separately.
Instead of producing one complicated stencil, divide the artwork into individual layers. Each layer can then be printed, cut, or painted independently.
For example, a portrait could contain:
- Background layer
- Main subject layer
- Shadow layer
- Highlight layer
A composite preview can help you understand how those separate pieces will look when combined.
When exporting the project, keeping each layer as an individual stencil image can make the production process easier to manage.
What Are Stencil Bridges?
One of the most important concepts in stencil design is the bridge.
A bridge is a small connecting section that keeps an enclosed area attached to the main stencil sheet.
Without bridges, enclosed shapes can become detached during cutting.
For example, letters such as O, P, A, and R contain enclosed areas. If those internal pieces are completely surrounded by cut lines, they may fall out of the stencil.
Adding carefully positioned bridges keeps those areas connected.
The correct bridge width depends on the material and intended application. A reusable stencil made from flexible material may need stronger connections than a temporary paper stencil.
The goal is to maintain physical stability without making the artwork look unnecessarily distorted.
Best Settings for Clean Stencil Results
The best settings depend on the source image and the final application.
For Simple Silhouettes
Use stronger contrast and simpler shapes. You generally do not need to preserve small tonal differences.
For Portraits
Keep important facial and structural features while removing distracting background information.
For Painting
Prioritize recognizable shapes and durable connections. Extremely thin sections can make the stencil difficult to use repeatedly.
For Cutting
Pay close attention to narrow paths, small islands, disconnected pieces, and bridges.
For Multi-Color Artwork
Use separate layers so each color can be applied independently.
The best workflow is to generate several previews rather than assuming the first conversion is the final design.
Which Images Work Best?
The best source images for stencil conversion usually have:
- A clear subject
- Strong contrast
- Sharp edges
- A relatively simple background
- Good resolution
- Limited overlapping objects
High resolution can help preserve useful information, but resolution alone does not guarantee a good stencil. A high-resolution photograph with a complicated background can still produce poor results.
A lower-resolution image with a strong silhouette may actually be easier to convert.
Think about the final stencil rather than the original photograph.
Supported Image Formats
Supported formats depend on the specific stencil tool you are using, so check its upload requirements before preparing a project.
Common raster formats include:
- JPG
- PNG
- GIF
- BMP
- WebP
Some workflows also support additional formats, but you should not assume that every editor accepts PDF, AI, EPS, TIFF, or other specialized files.
For Cricut users, the official Cricut Design Space image upload documentation explains the supported upload workflow and available image types.
If a tool does not support your original format, convert the image into a supported format before uploading.
PNG vs. SVG for Stencils
serve different purposes.
PNG is a raster image format and works well when your design is primarily image-based.
SVG is a vector format. Because vector artwork is defined using shapes and paths rather than fixed pixels, it can be scaled without the same loss of quality associated with raster images.
For a technical reference, MDN’s SVG documentation provides detailed information about SVG and how the format works.
For example, SVG can be useful when a stencil needs to be resized from a small craft design to a larger cutting project.
However, an SVG is not automatically production-ready. Its paths and structure still need to be checked before sending it to a cutting workflow.
Using a Stencil Maker With Cricut
A photo converted into a stencil can be useful for Cricut projects when the resulting file is compatible with the intended workflow.
Cricut Design Space is Cricut’s design software for creating, customizing, and preparing projects for Cricut cutting machines. It is available for desktop and mobile devices.
Before sending a design to Cricut, check:
- Overall dimensions
- Cut lines
- Small fragments
- Bridges
- Layer alignment
- Unwanted background areas
- Text converted to appropriate shapes where necessary
Cricut’s official documentation also provides information about using images in Design Space, including uploading your own images and working with them on the Canvas.
For stencil-specific production, Cricut provides official Smart Stencil and Stencil Film instructions, including material and cutting guidance for supported Cricut machines.
This makes Cricut’s own documentation a useful reference when moving from digital stencil artwork to an actual physical stencil.
Preparing Stencils for Cutting
Cutting projects require particular attention to geometry and physical stability.
Before cutting, inspect:
- Extremely narrow sections
- Tiny holes
- Disconnected shapes
- Fragile bridges
- Duplicate paths
- Unwanted fragments
- Overall dimensions
A design that looks attractive digitally can still fail when transferred to a physical material.
If you are using Cricut stencil film, follow the material-specific instructions provided by the manufacturer. Cricut’s official guide explains the workflow for loading stencil film, selecting the appropriate material setting, cutting the design, and weeding the finished stencil.
For other cutting machines, always verify the machine, material, blade, speed, pressure, or other production settings separately.
Designing for Different Project Sizes
Before exporting, consider the final dimensions of your stencil.
For example:
- Small craft stencils need manageable details.
- Shirt designs need clean shapes and readable edges.
- Wall artwork may require tiled printing.
- Cutting-machine projects need compatible dimensions.
- Reusable stencils need durable bridges and connections.
If you use Cricut Design Space, its official Templates feature can help visualize a design against a project-size guide before sending it to the machine.
This can be useful when the final stencil needs to fit a specific surface.
Wall-Sized Stencils
You do not always need a large-format printer to create a large stencil.
One practical approach is to divide the artwork across multiple standard pages.
You can use:
- A4 or Letter sheets
- Tiled printing
- Alignment marks
- Tape
- A large flat surface
After printing, carefully align the pages and join them together.
Small alignment errors can become much more noticeable as the design gets larger, so take time to verify the joins before transferring the stencil.
Printable Stencils
For a physical stencil, the final output should match the intended printing process.
A printable PDF can be useful when preserving page dimensions and layout is important. PNG can be convenient when working with raster artwork.
Before printing, check:
- Page size
- Orientation
- Scaling
- Margins
- Image dimensions
- Print quality
Do not rely only on the printer’s default scaling settings if the stencil must be produced at an exact physical size.
Text, Alphabet, and Number Stencils
Text stencils require additional planning because letters often contain enclosed areas.
Alphabet and number designs are useful for:
- Signs
- Labels
- Crafts
- Wall decoration
- Repeated markings
- Personalized artwork
Choose fonts with shapes that remain readable after cutting.
For enclosed letters, use bridges or stencil-friendly typography so internal sections remain attached.
Pay attention to:
- Letter spacing
- Line spacing
- Stroke width
- Outline width
- Bridge placement
- Overall readability
For custom names and phrases, always preview the complete word rather than evaluating letters individually.
Common Uses for an Online Stencil Maker
A browser-based stencil generator can support many creative projects, including:
- Wall art
- Painting
- Spray painting
- Woodworking
- Wood carving
- Signs
- Screen printing
- T-shirt artwork
- Airbrush projects
- Coloring pages
- Decorative crafts
- Cricut projects
- Vinyl cutting
- Laser-cutting preparation
- Multi-color artwork
The same source image can often be simplified differently depending on the material and application.
Mobile Stencil Making
A browser-based editor can make stencil creation more convenient because you can work from a phone or tablet without installing dedicated desktop software.
Cricut’s official documentation confirms that Design Space is available across desktop and mobile platforms, showing that mobile-based design workflows are increasingly practical for cutting projects.
A practical mobile workflow is:
- Select a photo.
- Upload it through the browser.
- Crop the image.
- Adjust the conversion.
- Preview the stencil.
- Make corrections.
- Export the result.
The experience depends on the specific tool and device, so complex projects may still be easier to manage on a larger screen.
AI-Powered Stencil Creation
AI-assisted image processing can speed up the first stage of stencil creation by automatically identifying subjects, simplifying images, or generating stencil-style artwork.
This can be especially helpful when the original photograph contains a recognizable subject but requires significant background cleanup.
However, automated generation should not replace inspection.
Before cutting or printing an AI-generated stencil, check:
- Important details
- Thin sections
- Bridges
- Background artifacts
- Layer separation
- Physical stability
AI can provide a strong starting point, but manual refinement is still valuable for production-oriented designs.
How to Get Better Results From a Free Stencil Maker Pro Online
If your first result does not look right, do not immediately change the entire image.
Try these adjustments:
Use a simpler source image:
A clean photograph often requires less editing.
Increase contrast:
This can make important boundaries easier to separate.
Remove the background:
Unwanted objects can create unnecessary stencil areas.
Reduce noise:
Small visual fragments can make a design difficult to cut.
Simplify thin sections:
Fragile pieces can break during physical use.
Check the preview repeatedly:
Small setting changes can significantly alter the final design.
Test before mass production:
A small physical test can reveal problems that are difficult to identify on screen.
Frequently Asked Questions
What Is a Stencil Maker?
A stencil maker is a tool that converts artwork, photographs, text, or other graphics into simplified shapes that can be printed, painted, or cut as a stencil.
How Do I Turn a Photo Into a Stencil?
Upload a clear image, simplify the background, adjust contrast or conversion settings, generate a preview, and manually correct areas that are too thin, disconnected, or unnecessary.
Is a Free Stencil Maker Pro Online Good for Beginners?
Yes. An online workflow can be easier for beginners because it removes the need to learn complex design software before creating a basic stencil.
Can I Create a Stencil From Any Photo?
Not every photograph produces an equally useful result. Clear subjects, strong contrast, and simple backgrounds generally make conversion easier.
Can I Make Multi-Layer Stencils?
Yes, when the tool provides layer separation. Individual layers can represent different colors or sections of a larger design.
What Are Stencil Bridges?
Bridges are connecting sections that keep enclosed areas attached to the stencil sheet. They help prevent isolated pieces from falling out during cutting or painting.
Can I Use a Stencil Maker With Cricut?
Yes, provided the exported design is compatible with your Cricut workflow. Cricut provides official documentation for image uploads, Design Space, and stencil-film cutting workflows.
Is SVG Good for Stencils?
SVG can be useful when you need scalable vector artwork because vector graphics can be rendered at different sizes without the same pixel-based limitations as raster images.
Can I Use Stencils for Cutting?
Yes, but the artwork should be checked for narrow sections, disconnected areas, duplicate geometry, and fragile bridges before production. Machine and material settings should also be verified separately.
Can I Print a Large Stencil?
Yes. A large design can be divided across multiple A4 or Letter pages and assembled carefully before use.
Can I Make Stencils on My Phone?
Yes, if the stencil tool provides a responsive browser-based editor. Cricut also supports Design Space on iOS and Android devices.
What Can I Use a Stencil For?
Stencils can be used for painting, wall art, spray painting, signs, woodworking, crafts, screen printing, Cricut projects, decorative artwork, and other creative applications.
Final Thoughts
A Free Stencil Maker Pro Online can simplify the process of turning ordinary images into practical stencil designs. The best results come from combining automatic image conversion with thoughtful manual refinement.
Start with a strong source image, simplify unnecessary details, adjust the conversion settings gradually, and always inspect the preview before exporting. For physical stencils, pay particular attention to bridges, narrow sections, enclosed areas, and layer alignment.
If your project is intended for Cricut, use the manufacturer’s documentation alongside your stencil generator. Cricut provides dedicated resources covering Design Space, image uploads, templates, and stencil-film cutting, making these useful authoritative references during the production process.
For scalable artwork, SVG can be a useful choice because vector graphics can be rendered at different sizes without the pixel-based quality loss associated with traditional raster images. MDN’s SVG reference is a reliable technical resource for understanding the format.
Ultimately, the goal is not simply to create an attractive image on screen. The goal is to create a stencil that remains clear, stable, printable, and practical for the material and project you have in mind.